Send us your questions

Some of our visitors have sent emails with interesting questions, we decided to start having a space to answer them. In this space the blog "Restless Minds" will answer all questions you send us
Send us your question for the email: Restless Minds.

Science progress affects our daily life and "to know" means you are going to chose right, because it allows you to form your own opinion on scientific everyday issues. On the other hand, having an elegant and harmonious vision of the world where we live in leads to a feeling of intellectual satisfaction.
We believe this kind of scientific day to day knowledge should be encouraged from an early age, and that's why this project was born: science, culture, knowledge, crafts for your restless mind.
Showing posts with label plastic bottle. Show all posts

Tuesday, October 1, 2013

Spiders with plastic bottles

This is a great and easy idea from decor e culinaria" blog. his project will keep your restless occupied for a few hours and will save you some money when the time to decorate Halloween comes. In addition is a project that recycles and reuses old plastic bottles.

What we need:
  • plastic bottles, any size will do,
  • craft knife,
  • scissors,
  • thin rope or twine,
  • electric driller, small,
  • black acrylic paint,
  • small brush,
  • fishing line,
  • sewing needle,
  • old newspaper, to protect the surface.

How to:
(this project requires adult supervision!)

  • Drill 2 small holes near the bottle opening;
  • Drill a 3th hole in the bottom;
  • With the craft knife cut the bottle in 2 parts, like the image- one will look like a funnel, the other like a cup;
  • Paint the 2 parts with the black paint;
  • Let it dry;
  • Paint the interior;
  • Let it dry;
  • Use the scissors to slice the cylindric half, like image 7, this will do a sider with more then 8 legs... it's a Halloween mutant;
  • Bend the plastic slices in two points, one near the spider body, and the other like a knee (halfway the end of the leg).
  • Follow the image 9 and 10 to cut and bend the other half of the bottle;
  • Remember the drilling job you did at steps 1 and 2? Use the holes, the fishing wire, and the needle- if you need it- to hang the spiders on the celling;

  •  


    Et Voilá!
    Everyone will love this black and huge spiders!

    Enjoy!

    Thursday, February 21, 2013

    Lava lamp DIY- Recycling materials

    A lava lamp is an object containing droplets of colored wax inside a closed glass container filled with clear liquid, the wax rises and falls due to changes in density caused by heating. This heating is due to the presence of an incandescent lamp.

    Today we will build a lava lamp using plastic bottles.

    What we need:
    • empty plastic bottle,
    • cooking oil,
    • funnel,
    • water,
    • food coloring,
    • tape or glue.
    How to:
    1. Wash the bottle, remove the label and any residues of glue that may have;
    2. With the funnel fill the bottles to 3/4 with oil;
    3. Fill a measuring cup of water;
    4. Add water 3 or 4 drops of food coloring, the red gives it "that" look!;
    5. Add the water to the bottle, use the funnel;
    6. Cap and seal the bottle with glue, adhesive tape can also be used, but the glue is safer;
    Your restless will love to see the bubbles go up and down, do not stir too intensely, always use smooth movements.

    Plastic bottles are certainly a fantastic item to use on your crafts!

    Et Voila!
    A homemade lava lamp.

    Enjoy!

    Monday, January 21, 2013

    Super restless bottle animals

    I found his idea here in Banana Craft blog , and you can find the step by step here.

    This craft recycle PET bottles, and the result is a lot of color and fun animals.

    What we need:
    • PET bottles, The step by step instruction use 600ml bootles, but you can use any,
    • hot glue;
    • soft paper;
    • EVA;
    • felt;
    • googly eyes, or small buttons;
    • PET caps, yogurt or soda;
    • rice, you can use sand or beans;
    • paint, spray works best;
    I think the step by step is very good, so I will leave you with the final result.

    Et Voilá!
    Fun fun fun!

    Enjoy!

    Saturday, January 14, 2012

    Plastic bottle moneybox (PET)


    Transform a plastic bottle into a piggy bank.

    What we need:
    • plastic PET bottle with cap,
    • 4 PET bottle caps or 4 cork wine stoppers,
    • acrylic paint,
    • cardboards,
    • double tape,
    • exact-O knife or scissors;
    • color markers;
    • other materials you want to reuse, as buttons for the eyes.
    How to:
    1. Remove all the stickers and labels from the bottle;
    2. Wash it with running water;
    3. Let it dry completely;
    4. Close the bottle and place it in horizontal position;
    5. With the marker draw the place where you want to make the hole for the coins;
    6. Use the scissors, or the exact-O knife to open the hole, this requires adult supervision;
    7. Glue the 4 caps o the bottle, they must pretend they are the pig feet but most of all they must keep the bottle steady;
    8. Now its time to get creative ad to make your piggy bank one of the kind, paint it and decorate it at will, reusing materials is a good option.
    Tips:
    • Use hot glue for the feet;
    • Use double sided tape to glue the cardboard;
    • If you paint the bottle paint it first with white;
    • The normal acrylic paint comes off the plastic after a while.
    Et Voilá!
    Enjoy!

    Monday, November 28, 2011

    The shrinking bottle

    We already did several demonstrations here to prove that the air takes up space.
    Today the demonstration is another way to play with the air.

    What we need:
    • plastic bottle, with cap,
    • hot water,
    • funnel.
    How to:
    1. Wash the bottle;
    2. Let it dry;
    3. Heat up the water, don’t let it boil, its not necessary;
    4. With the funnel pour the water in the bottle;
    5. Wait for 10 sec;
    6. Reject the water to the sink;
    7. Quickly cap the bottle again, you have to be fast.
    What happen?
    The bottle shrinks.
    In other words, the bottle walls collapse.

    Remember this? What happens to the bottle is exactly the same thing.
    Before further explanations is very important to understand two things:
    First: air exerts pressure on the bottle, like in everything around us, including ourselves.
    Second: any forces system tends to look for equilibrium.

    So,
    The hot water heats the air inside the bottle. Try to close the bottle immediately after pour the water inside, the bottle will swell, that’s because hot air can't escape to atmosphere. When you reject the water, the air inside the bottle rapidly cool. The cool air occupies less space then the hot air, and, theoretically there will be a lot of "empty space" inside the bottle, because of that the plastic walls collapse under the pressure of the air outside the bottle.

    Et voilá!
    Another fun way to spend some time

    Enjoy!

    Making a shower- air pressure


    Today we are going to see something we see every day but we are not trained to think about it. In fact is very simple and very easy to understand.

    When we uncap a bottle and we turn i upside down, the liquid inside is spilled. But it will go slowly if you maintain the botlle at the 90 degrees angle, if you reduce the angle to 45 or even 30 degrees the flow of liquid increases . 


    If it's your job to refill the cruet you know exactly what we are talking about.


    What we need 

    • plastic bottle,
    • water,
    • hammer.
    • nail,
    • big bowl.
    How to:
    1. Fill the bowl with water;
    2. With the hammer and the nail open 3 small holes on the bottom of the bottle, don't make them to large;
    3. Place the bottle inside de bowl;
    4. Fill the bottle with water;
    5. Close it tight;
    6. Grab the bottle by its neck and lift it, don't squeeze;
    What happen? 
    Nothing, water remains inside.
    Slightly uncap the bottle, and now?
    Close it again, and now?
    We easily observe that even with a punched bottle the water stays inside, however, if we uncap the bottle the water flows.

    Why?
    The bottle is filled with water, but in order to make the water come out the bottle it is necessary that something "takes its place" inside the bottle.


    Since the bottle is closed and the bottleneck is the only place where "something" can go in the bottle, the water stays in.
    This something is the air. When we slight uncap the bottle the air goes in and push the water down, through the holes, taking its space inside the bottle.

    In other words:
    Atmospheric pressure.
     

    When the cap is tight, the atmospheric pressure, which acts in all directions, apply force through the holes and secure the water inside the bottle.
    If the bottle is closed, that pressure doesn’t act directly on the surface of water, the water remains inside.
    If you uncap the bottle, atmospheric pressure acts in water surface and the water falls through the holes.

    Et voilá!
    Tricky uh?
     

    Enjoy!

    Tuesday, November 22, 2011

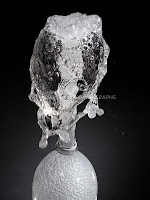
    Geyser Cola/ Mentos or Soda/ Candy

    At first looks like a dangerous and silly prank, but if well done, on the right place is spectacular, and makes all adults want to be restless young minds.

    Don't do this at home, chose an easy cleaning place!

    What we need:

    • fotografar animais1 coke bottle, full,
    • 1 Mentos pack,
    • 1 cardboard, enough to "close" the bottle,
    • 1 test tube... or a paper funnel,
    How to:
    1. Chose the place to this demonstration wisely, it will be messy, and you must be able to run away... fast;
    2. Uncap the coke bottle;
    3. Place all the Mentos (about 10) on the paper funnel, or test tube;
    4. If you are using a test tube , place the cardboard on the top and turn the tube upside down;
    5. If you are using the funnel close the end with the cardboard;
    6. Place the tube/funnel on the bottle uncapped top;
    7. Look around and chose a direction to run away;
    8. Remove the card quickly, so the candies fall in the bottle.
    9. Run!
    Coca cola mentos geiser"Parents friendly" alternative
    You can do this on a smaller scale, without the amazing geyser but with same effect, and best of all, without the mess.

    What we need:
    • 1 glass,
    • 1 Mentos pack,
    • Coke or other carbonated drink.
    How to:
    1. Put the glass inside a bowl;
    2. Fill half of the glass with your drink;
    3. Throw 1 Mentos inside;
    4. You don't need the running part.
    Results:

    Before any further conclusion, 
    • What happens isn't a chemical reaction! its a physical phenomenum, witch results in the sudden production of carbon dioxide resulting in a massive bubbling;
    •  If we look closer, Mentos surface is very rough... those irregularities are responsible for gas formation and sudden release.
    • Soda is made up mostly of water and sugar.
    Knowing, these 3 things, lets try to find out what happen:

    Carbonic drinks, like coke and other sodas, contain, as its name indicates, dissolved carbon dioxide. This gas is in equilibrium  and under a certain pressure- that’s the key the pressure- ready to escape as soon as the pressure on the liquid surface lower. All we know that’s necessary to remove the cap of the bottle with careful, without shake the liquid, otherwise all the drink will come out the bottle.
    Until you open the bottle, the gas remains in suspension on liquid, and it can expand to form bubbles.
    Note that if you place the soda in a glass and submerge a toothpick on it, its surface will form bubbles immediately.

    Why?
    Water molecules attracted each other strongly, holding the gas bubble in a kind of water molecules net. To form a new bubble or to expand the existing bubbles the water molecules must to move away from each other. Extra energy is needed to break this surface tension! In other words the water shows resistance to soda bubble expansion.

    Coca cola mentos geiserIn this demonstration Mentos candy is going to perturb the coke equilibrium, the surface tension, this allows the CO2 to escape.

    How?
    When you drop the Mentos on the bottle the surface tension is disturbed, and therefore the expansion and formation of new CO2 bubbles becomes possible. Mentos have thousands of micro holes on the surface those are called nucleation places- perfect places to form CO2 bubbles. As soon as Mentos touch the soda the bubble formation is initiated in its entire surface.
    When all this CO2 is released from the bottle takes the liquid with it.

    In conclusion:
    This process depends greatly on CO2-under pressure- and on a element that disturb the tension -the element must be porous with nucleation holes), So we can conclude this demonstration can be done with any drink with bubbles like Sprite, beer, or even Red Bull.
    We don’t know any other candy that works best then Mentos. They have thousands porous and heavy; they drown and don’t come out with the geyser.


    Watch MithBusters movie "MythBusters - Diet Coke & Mentos":


    Note that: Internet sources tells us that the use of diet coke works best because the low sugar ratio, witch delays the bubble formation

    Sources:
    Mentos e Coca-Cola- Ciência Hoje


    Et voilá!

    Enjoy!

    Friday, November 18, 2011

    A Christmas tree with plastic bottles (PET)

    Imagination and creativity make all the difference.
    The super restless idea this week smells like Christmas and came from here

    Watch the video, all you need is a stick, plastic bottles, scissors and a candle.

    the video is in Portuguese
    but the walk through is easy to follow

    Et voilá!
    Another great idea to this season

    Enjoy!

    Thursday, November 17, 2011

    A garden on the balcony

    Another super restless idea from Andreza's blog to reuse plastic bottles (we also recycle / reuse here)
    Its a simple concept, planting aromatic herbs in your balcony using bottles as pots.
    Your restless will love the idea of those "little green things" growing outside, and its halfway to make them eat their vegetables.


    We will need:
    • 3 plastic PET bottles,
    • pot soil, enough to fill the bottles,
    • fertilizer,
    • sand,
    • seeds of parsley and chives,
    • water,
    • exact-O knife,
    • scissors,
    • shovel and rake,
    • flowerpots clamps,
    How to:
    1. Cut the bottles with a sharp knife, open a hole with 20 cm on each bottle,
    2. Punch a hole in 2 of them.. on the bottom;
    3. Don't punch the third, this one will catch the water that falls from the other 2;
    4. If your restless kids want to decorate the flowerpots, now its the moment, they can use paint, paper, or anything else they want;
    5. Mix 3 parts of pot soil, and 2 of fertilizer, you can use exterior fertilized pot soil, 
    6. Place this soil on both punched bottles,
    7. Seed and water the plants (already done this here)
    8. Place the sand on the third bottle. 
    9. Chose a wall you can drill and attach the flowerpots clamps to it. Leave 20cm between each one.
    Hang the system to a height that allows children to see the plants.

    Variations:
    there are several ways to do this project. You can chose to use a string system, is cheaper the the final result is the same. for this you will need 2 fixation points, you can use 2 nails.
    You can plant anything you want, not just shovel and rake.


    Et Voilá!

    Thank you Andreza!

    Enjoy!

    Thursday, November 10, 2011

    Vulcano- Sodium Bicarbonate and Vinager eruption

    This is one of the most popular homemade experiences, not the one that give us less work but the one that has more fans with amazing results.
    Don’t build your volcano indoors, chose a place where you can do a big and huge mess, with fresh air circulation, vinegar smell can become very strong.

    We will need:
    • baking soda- sodium bicarbonate,
    • vinegar, white and without flavors will work better,
    • food coloring, lava is red but you can do it any color you chose
    • plastic bottle, PET, medium,
    • 6 flour cups,
    • 2 water cups,
    • 4 oil tablespoons,
    • 2 salt cups,
    • tap water,
    • dishwasher detergent,
    • big bowl,
    • materials like leaves, branches, sticks... ,
    • large board.
    How to

    FASE1
    1. Prepare the place where you are going to build the volcano, beware with your clothes;
    2. Mix the flour, the water, the salt and the oil in the bowl;
    3. Mix until homogenized;
    4. Place the bottle on the board and mold the volcano cone around it. The bottleneck will be the crater and therefore must remain open;
    5. With the materials you collect- leaves, branches, sticks... - place your trees, houses, bridges, etc.

    FASE 2- Eruption
    1. Fill the bottle in the volcano halfway with the tap water;
    2. Add food coloring, and about 6 dishwasher detergent drop;
    3. Add 3 or 4 tablespoons of baking soda;
    4. Squeeze vinegar bottle to the crater;
    NOTE: As soon as you squeeze the vintage the chemical reaction begins, but don’t stop, keep squeezing the bottle for a few more seconds.

    What happened?
    Vinegar (acetic acid) reacts with sodium bicarbonate and neutralizes it. In the reaction Carbon Dioxide (CO2) is formed and produces the bubbly and effervescent effect.
    Food coloring gives color to your lava and the dishwasher detergent helps the effect to last longer.

    Et voila!
    Enjoy!

    Wednesday, November 9, 2011

    Homemade rain gauge

    The rain is here, and is causing a huge mess.

    In Portugal the higher precipitation value registered was back in January of 1977, in a place called Penhas da Saúde.
    When measuring precipitation scientists have a goal, a very simple one, to determinate the water quantity that falls in a given place during a given period of time.

    The measure is done by collecting water with a rain gauge, and estimating the high that it would reach if there was no evaporation, no infiltrations, and no draining.
    The quantity of precipitation is measured in mm or in, in a given time period in a given area, that means, for example 24in/ft2/24h.
    Today we will see a easy way to do this measure... in your own backyard. In fact the procedure is very simple and doesn't require any special material, obviously we will not collect scientific precision data, but its good enough to have a good idea on the procedure.

    First of all, this experiment can only be done in the rain season, and because we are not using scientific equipment, is convenient the temperature is low, otherwise the water will evaporate.

    We are going to build our first tool on the homemade "meteorological station", the rain gauge

    We will need:
    • paper,
    • pen,
    • ruler,
    • plastic bottle, with a flat bottom,
    • large can, can be a bucket or similar, the bottle has to fit in,
    • waterproof pen, an alternative is to arrange water resistant tape where you can write,
    • insulating tape,
    • shovel,
    • a corner in the backyard, that is not protected from rain.
    How to:
    1. On a sheet of paper draw a graph, the X-axis and Y, on the X-axis mark the day, the days can be different from the day of the month you are in, the important is you know the number of days you experience has. Day1 can be the first day of the test, you can record the duration of the test in the title bar of the graph, for example, "Rain on granny’s backyard- from 10/11/2011 to 10/12/2011", the y-axis is the amount of rainfall in “in” (I advise to mark the bottle not in “in” but in 1/10in or millimeters);
    2. Wash the bottle, remove any glue or paper;
    3. The bottle is round on top and straight on the bottom, cut it in 2 pieces in the place it becomes straight, its about 1/3 from the top (the neck).
    4. Use the ruler and water resistant pen and mark in on the straight part, which now looks like a big water glass, I advise to mark the bottle not in “in” but in 1/10in or millimeters, the more small is the measure the more accurate is the reading;
    5. Place the top of the bottle (upside down, type funnel) at the bottom (glass);
    6. With duct tape firmly attach both parts;
    7. Dig a hole in the "corner of the backyard," this place has to be exposed to rain;
    8. Bury the bucket / bin;
    9. Place the bottle in;
    10. When you put the bottle the experience begin, record the time of the day;
    11. Every day, at the same time, and during the entire period of your experience, register on the chart the height of water on the bottle;
    12. After each reading, empty the bottle and put it back into place;

    NOTE: As an alternative to plastic (PET) bottle can use a tall glass flask and a plastic funnel, the procedure is the same.

    References: http://www.meteo.pt

    Et voila!

    Enjoy!

    Tuesday, November 8, 2011

    Plastic bottle and clay submarine magic

    Believing in magic its an art. As we grow we lose the ability to believe in it. 

    Today we invite everyone to experiment this: 

    We will need: 
    • PET bottle with the cap, must be transparent
    • water, 
    • a cap of a pen, mine was transparent,
    • modeling clay, I used green clay
    How to: 
    1. Fill the bottle with water, the bottle must be filled to the brim
    2. With the dough make a “belt” on pen’s cap, don’t use too much or the submarine will be very heavy, and drawn;
    3. Make a small ball with the dough and prick under the lid, This will be your submarine;
    4. Open the bottle, place inside the submarine, be carfull the cap must stay up,
    5. Close the bottle, 
    6. Press and release the bottle, slowly and gently, what happens to our submarine? 

    Comments: 
    The plastic is heavier, denser, then the water, but when we put the submarine on the bottle it has a air bubble inside the cap (where we attached the clay ball). This air is compressed when we squeeze the bottle and free some space that is occupied by the water, and the cap/submarine goes down, if we release the bottle the air bubble expands, the water is repelled and the submarine goes up. 

    Et voilá! 
    Now that you know how to, see what you can do with a bit of training

    Enjoy!
    Related Posts Plugin for WordPress, Blogger...